It was sitting in my mailbox after work.
An envelope. You know the type: tightly folded, perforated tabs on each end with small print that says FOLD AND TEAR ON PERFORATION. I knew what it was, but after reading Sean's comment to my previous post I was a bit apprehensive. Could this be the denial postcard of which he had so vehemently directed his words and in fact most of his own entire blog? It was within the realm of possibility.
Alas, and forsooth, yea, verily, it was a check. Not just any check, mind you, but one pre-printed with the greatest of efficiency, minimizing the resources consumed to create and propel it on its winding journey from Young America, Minnesota to my humble abode on the west coast.
One lovingly personalized as it passed through a high-speed printer and mass-mailing folding machine, with my given name...
The name my bank will recognize as being associated with my checking account.
So as I bathe in the light reflected by its preprinted whiteness and sip my nitrogen-charged Murphy's Stout my eyes are drawn to the numbers enclosed within a small grey box along the right-hand side of the check, just below center...
***$50.00
... and there was much rejoicing.
Saturday, March 18, 2006
Saturday, March 04, 2006
SIRIUS Starmate Replay: The Chevy S10 pickup install
At long last, it is here. Never mind that I used an old camera with genuine actual film I had to have developed. I don't have physical pictures, mind you, 4X5 monstrosities that only take up space. I had the pics transferred from analog negatives directly to digital bits on a CD, thank you very much. Thanks to my buddy Em for use of her low-tech but functional camera. All of these pics are after-the-fact, but should still show you how I did it. It's a long post, but hopefully you'll find it informative. The truck is a 1994 extended cab.
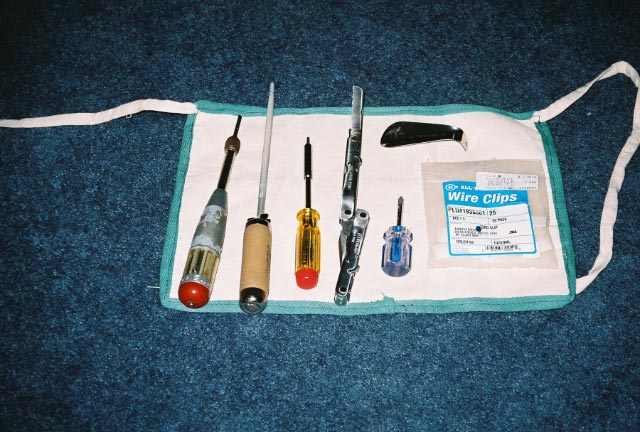
First, the tools. Nothing particularly specialized here, though I did need the right sized hex-head wrench to remove the plastic lens from the third brake light. I bought it at the Chevy dealer, but something similar should be available at any hardware store. From left to right, we have: 1) Craftsman hand drill with multiple sized bits; 2) round file: 3) hex wrench; 4) Leatherman Super Tool; 5) small Phillips head screwdriver; 6) shoe horn; 7) plastic wire clips.

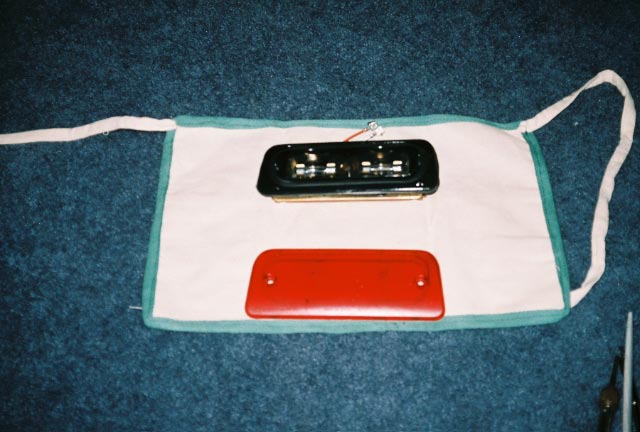
The first step was to put the antenna wire from outside through the third brake light to inside the cab. First I removed the two Phillips head screws that hold on the interior cab light onto the back of the brake light. I thought I'd be able to route the wire through a hole somewhere in the brake light's housing, but the holes there weren't big enough. I happen to have an extra third brake light because I had intended to replace the whole component at some point, but that's another story. Anyway, here's what the light looks like by itself:
 Black housing, two bulbs, red lens. Each of the bulbs is within a small concave cavity, both cavities coming together in the middle to form an angle, like the inside edge of a Venn diagram. Apologies for the lack of close-ups.
I used the hand-drill to make starter holes from the outside right in the center on each side of the "angle" between the two bulbs that equalled the approximate diameter I needed to fit the antenna plug through. It ended up being about half an inch wide. There didn't appear to be any electrocution danger since the wires are at the side of the housing. With 6 to 8 holes made all the way through the plastic housing I then used the Leatherman saw blade and the round file to enlarge and shape the hole. I wasn't able to capture a good angle or distance for an interior shot of the hole, but here it is:
 It's the red circle right there in the middle. Maybe those wires are closer than I remembered. Once that was done I fed the antenna wire through there and immediately underneath the headliner toward the back window. I pulled all the slack through, leaving enough to route it around the outside housing and onto the roof.
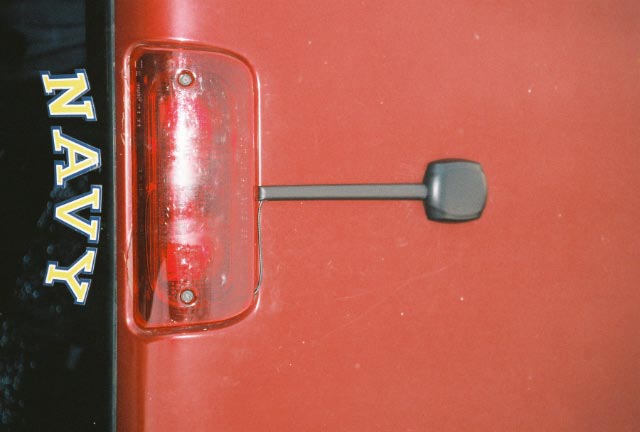
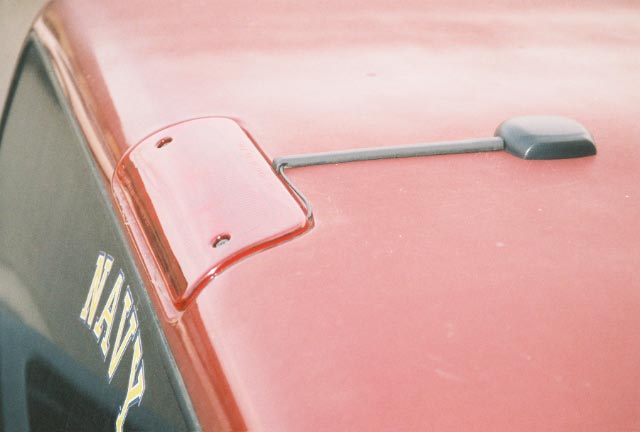
The finished installation from the outside looks like this:

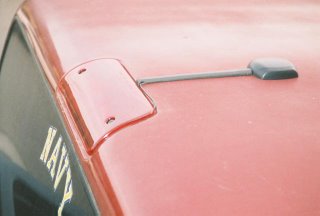
I had to make matching notches in the black interior housing and red lens to allow the wire to pass through with the housing fully screwed down. These notches were made with the Leatherman saw blade. Again, this is after the fact so it's not easy to see, but the lens extends about 1/4" beyond the actual bulb housing all the way around, forming an interior weather seal for the cavity and a small channel outside of that which I used for the wire. I notched the interior housing and lens to allow the cable to pass to the "channel" toward the rear of the truck. I routed the wire from the inside, out the hole, through the notches, around the housing to the right and then straight up toward the front and through another notch made in the part of the lens that overhangs the housing, where you can see it emerge above. It took 4 or 5 tries of holding the cable and screwing down the lens at the same time to make the cable length come out right. My reasoning with that route was that if any water came in the notch on the front of the housing it still wouldn't reach inside the cab because the notches where the cable actually goes inside are at the rear. It's been raining like mad up here in Sacramento for weeks and nothing has shorted out yet so I'm counting this one a success. To finish off the outside installation I also made a notch into the side of the plastic strip that holds down the antenna wire. You can see it just a bit in the picture.
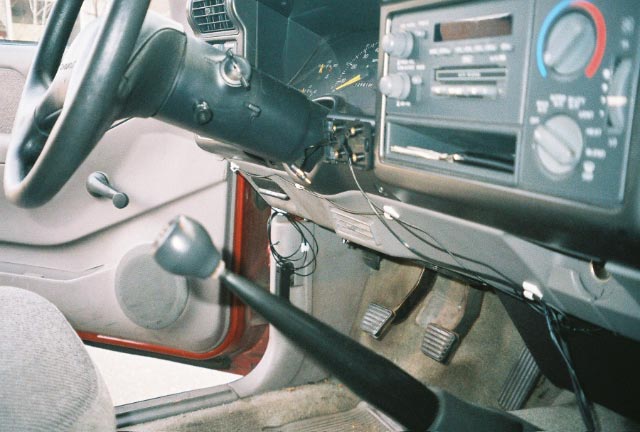
Once inside the cab, the purpose of the shoe horn becomes clear. I used the flat part, the part you grab with your finger when performing a manual assist for your heel, to get under the edge of the headliner and all other plastic trim as I routed the wire toward the dashboard. From the other side of the third brake light, inside of the cab, I ran the wire toward the driver's side underneath the headliner, under the plastic trim along the driver's side, over the door, down the door frame and then around to the bottom of the dashboard right next to my emergency brake release handle. There's a bit more notching done here to accomodate the cable. You can see the cable emerge from the driver's side door seal and toward the light switch right next to the fuse box cover. There's a joint in the plastic trim right there where I notched to bring the cable around and under and behind the dash. Extra cable is looped there also.
 You'll notice the distinct influence of the Utilitarian style on my work. Exposed cable runs are a hallmark of the genre. Those little self-adhesive wire clips are awesome. $2 at Fry's Electronics for about 25 of 'em.
The opposite view:

And the finished interior view:

I mounted the tuner bracket just to the left of the main console right under the main gauge cluster. A little custom work on the bracket also -- I shaved down the tab on the left side of the bracket, the tab without the little extension to release the tuner, so the tuner would just pop out easily instead of my having to struggle with it. Here's how it looks from the driver's seat:
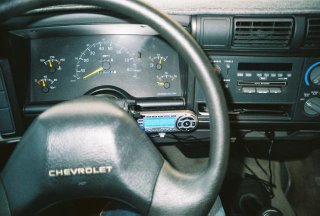 Recently (after about one month -- boooo!) the self-adhesive velcro that holds the bracket on has started to pull free causing the tuner to angle down a bit, so I've rigged up a paper clip that hooks to the back of the bracket and then up over the inside edge of the main gauge cluster. Works and looks great now.
I've had very few reception problems in and around Sacramento. The signal has been briefly lost under large overpasses (not frequent and not readily reproducible) and is definitely lost under fast food restaurant overhangs. Almost any time there's a metal structure above the antenna there's going to be a problem. Outside of the downtown area the "Satellite" antenna strength is almost always pegged to 10 bars. When downtown the "Terrestrial" antenna strength is usually 7 to 10 bars.
Related links: SIRIUS activation; SIRIUS impressions; SIRIUS billing; SIRIUS receiver rebate
First, the tools. Nothing particularly specialized here, though I did need the right sized hex-head wrench to remove the plastic lens from the third brake light. I bought it at the Chevy dealer, but something similar should be available at any hardware store. From left to right, we have: 1) Craftsman hand drill with multiple sized bits; 2) round file: 3) hex wrench; 4) Leatherman Super Tool; 5) small Phillips head screwdriver; 6) shoe horn; 7) plastic wire clips.
The first step was to put the antenna wire from outside through the third brake light to inside the cab. First I removed the two Phillips head screws that hold on the interior cab light onto the back of the brake light. I thought I'd be able to route the wire through a hole somewhere in the brake light's housing, but the holes there weren't big enough. I happen to have an extra third brake light because I had intended to replace the whole component at some point, but that's another story. Anyway, here's what the light looks like by itself:
 Black housing, two bulbs, red lens. Each of the bulbs is within a small concave cavity, both cavities coming together in the middle to form an angle, like the inside edge of a Venn diagram. Apologies for the lack of close-ups.
I used the hand-drill to make starter holes from the outside right in the center on each side of the "angle" between the two bulbs that equalled the approximate diameter I needed to fit the antenna plug through. It ended up being about half an inch wide. There didn't appear to be any electrocution danger since the wires are at the side of the housing. With 6 to 8 holes made all the way through the plastic housing I then used the Leatherman saw blade and the round file to enlarge and shape the hole. I wasn't able to capture a good angle or distance for an interior shot of the hole, but here it is:
 It's the red circle right there in the middle. Maybe those wires are closer than I remembered. Once that was done I fed the antenna wire through there and immediately underneath the headliner toward the back window. I pulled all the slack through, leaving enough to route it around the outside housing and onto the roof.
The finished installation from the outside looks like this:
I had to make matching notches in the black interior housing and red lens to allow the wire to pass through with the housing fully screwed down. These notches were made with the Leatherman saw blade. Again, this is after the fact so it's not easy to see, but the lens extends about 1/4" beyond the actual bulb housing all the way around, forming an interior weather seal for the cavity and a small channel outside of that which I used for the wire. I notched the interior housing and lens to allow the cable to pass to the "channel" toward the rear of the truck. I routed the wire from the inside, out the hole, through the notches, around the housing to the right and then straight up toward the front and through another notch made in the part of the lens that overhangs the housing, where you can see it emerge above. It took 4 or 5 tries of holding the cable and screwing down the lens at the same time to make the cable length come out right. My reasoning with that route was that if any water came in the notch on the front of the housing it still wouldn't reach inside the cab because the notches where the cable actually goes inside are at the rear. It's been raining like mad up here in Sacramento for weeks and nothing has shorted out yet so I'm counting this one a success. To finish off the outside installation I also made a notch into the side of the plastic strip that holds down the antenna wire. You can see it just a bit in the picture.
Once inside the cab, the purpose of the shoe horn becomes clear. I used the flat part, the part you grab with your finger when performing a manual assist for your heel, to get under the edge of the headliner and all other plastic trim as I routed the wire toward the dashboard. From the other side of the third brake light, inside of the cab, I ran the wire toward the driver's side underneath the headliner, under the plastic trim along the driver's side, over the door, down the door frame and then around to the bottom of the dashboard right next to my emergency brake release handle. There's a bit more notching done here to accomodate the cable. You can see the cable emerge from the driver's side door seal and toward the light switch right next to the fuse box cover. There's a joint in the plastic trim right there where I notched to bring the cable around and under and behind the dash. Extra cable is looped there also.
 You'll notice the distinct influence of the Utilitarian style on my work. Exposed cable runs are a hallmark of the genre. Those little self-adhesive wire clips are awesome. $2 at Fry's Electronics for about 25 of 'em.
The opposite view:
And the finished interior view:

I mounted the tuner bracket just to the left of the main console right under the main gauge cluster. A little custom work on the bracket also -- I shaved down the tab on the left side of the bracket, the tab without the little extension to release the tuner, so the tuner would just pop out easily instead of my having to struggle with it. Here's how it looks from the driver's seat:
 Recently (after about one month -- boooo!) the self-adhesive velcro that holds the bracket on has started to pull free causing the tuner to angle down a bit, so I've rigged up a paper clip that hooks to the back of the bracket and then up over the inside edge of the main gauge cluster. Works and looks great now.
I've had very few reception problems in and around Sacramento. The signal has been briefly lost under large overpasses (not frequent and not readily reproducible) and is definitely lost under fast food restaurant overhangs. Almost any time there's a metal structure above the antenna there's going to be a problem. Outside of the downtown area the "Satellite" antenna strength is almost always pegged to 10 bars. When downtown the "Terrestrial" antenna strength is usually 7 to 10 bars.
Related links: SIRIUS activation; SIRIUS impressions; SIRIUS billing; SIRIUS receiver rebate
Subscribe to:
Posts (Atom)


